Investigate POM mold deposits and black specks by tracing the material route, logging heat exposure and comparing where defects appear. A dark mark alone can’t tell you its cause. It doesn’t prove a resin lot is faulty.
A clean-looking purge sample can leave you with an unanswered question when the next part contains a speck. It’s tempting to change temperatures immediately. Instead, keep the samples and records first. Use them to compare dirty feed, old material in the machine and a local tool problem.
This guide sets out a clear record for process engineers, quality teams and resin buyers. It explains what to compare, what each check can show and what it can’t. Exact operating settings must come from the current grade documents and approved plant procedures.
Preparing a material discussion? Browse the plastic pellet catalog with the complete grade code, color and lot details at hand.
Key Takeaways
- Record tool residue and part inclusions separately, even when both appear during one run.
- Trace bags, transfer equipment, regrind and concentrate before assigning lot responsibility.
- Compare measured conditions and stop/restart history, not saved setpoints alone.
- Agree on recurrence checks and part acceptance before calling production recovered.
Distinguish POM Mold Deposits from Black Specks
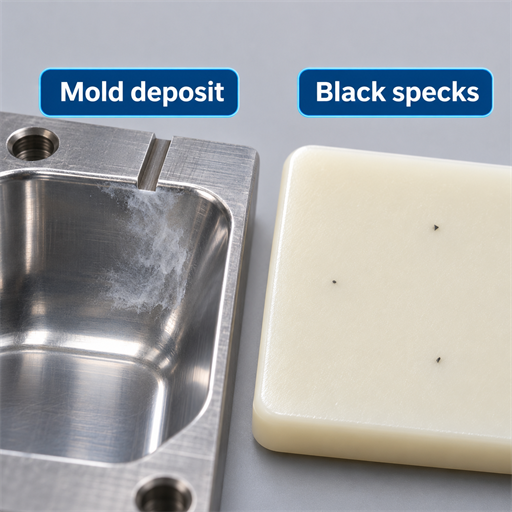
Record the location and shape
Start with what you can see. Write it so the next shift knows what to look for.
Is it a film on the cavity? A speck inside the part? A streak along flow, or a dark patch on the surface?
Mark the cavity, gate reference, side of the part and time. Photograph the same area with a scale and consistent lighting when practical.
Give the tool mark and molded sample their own IDs. Don’t merge them under a label such as “burnt resin” before checking the samples. Keep retained parts and any safely collected residue under the plant’s handling rules. Do not touch hot resin or try to identify it by smell.
| Observation | Candidate route to investigate | Next useful check | Limit of the observation |
|---|---|---|---|
| Film on a cavity or vent area | Material depositing on the tool surface | Map the location before approved cleaning | Appearance does not identify chemistry |
| Discrete dark inclusion | Contamination or retained degraded material | Compare feed, time and cavity records | Color does not prove burnt POM |
| Colored or dark streak | Color carryover or a changing melt stream | Check previous material and concentrate records | A streak does not locate its entry point |
| Burn-like surface patch | Local flow, venting or thermal conditions | Review its repeatable position with the tool specialist | A photograph alone cannot establish the mechanism |
Separate appearance from mechanism
The producer’s POM mold-deposit technical note describes volatile- and additive-related deposit routes. Its historical grade-specific experiments are useful context, not a test of what your residue contains. Don’t assume all deposits have one composition, or that every black speck came from the same route.
Illustrative scenario: An operator records a pale film near a vent and a dark dot inside a part. The quality engineer gives each observation its own sample label. Did they appear at the same time and in the same cavity? The labels don’t assume a shared cause.
Keep grade selection separate from this investigation. The POM acetal pellet guide explains the wider procurement task. Here, the useful result is a clear defect record and a next check, rather than a grade change based on looks.
Trace the Material Route Before Blaming the Resin Lot
Identify everything entering the process
Record the producer, full grade code and suffix. Add the lot, color and bag label. List the concentrate code and carrier. Keep the approved blend level and the record of what went in.
“Natural POM plus black masterbatch” leaves gaps: the base grade and carrier compatibility both need documentation.
Follow the route from the original container through storage, opening, transport, receiver and hopper. Note shared bins, hoses and handling tools. What resin used that route before? Find the cleaning record too.
A new bag label describes the bag; it doesn’t describe the contents left in a shared receiver.
| Point in the route | Record to retain | Comparison question |
|---|---|---|
| Original bag or container | Grade, lot, seal/opening history and retained sample identity | Is the same observation present before transfer? |
| Transfer and hopper | Line/bin identity, previous material and cleaning record | Where does the first documented difference appear? |
| Regrind | Source parts, grade, color, storage and repeated processing history | Can this stream be traced to approved material? |
| Concentrate/blender | Carrier approval, code, lot and addition record | Did identity or blending change with the defect? |
| Molded part | Cavity, time, sample ID and process record | Does the pattern follow material arrival or another event? |
Use this log to plan the checks. Follow the agreed method when taking samples. The pellet quality-control guide helps organize identity, sampling and release records. Use it to assemble a package before requesting a lot assessment.
Compare streams without changing the whole trial
Regrind adds another material history to examine. Record its source and handling instead of treating every regrind batch as identical. Ask whether scrap from another grade, color or changeover entered the grinder. If records cannot establish identity, record the gap.
Don’t guess what the blend contains.
An approved virgin-only comparison may help investigate a regrind branch. But if the team also cleans the machine, changes colorant and adjusts temperatures, a better-looking part can’t show which change helped. State which factors changed and which stayed fixed. Avoid turning a helpful screening result into a supplier-fault conclusion.
For incoming material, compare retained samples from the suspect lot with a documented reference using an agreed process suited to those grades. Keep the original labels. Record how samples were taken. If a speck appears only after transfer, investigate handling without claiming the unopened lot has been cleared by a small visual sample.
Review resin pellet storage and handling when opening or transfer history is unclear. Moisture is a separate question governed by the current grade guidance. Drying is not evidence that a foreign particle, incompatible carrier or old material has been removed.
Reconstruct Thermal History and Hold-Up
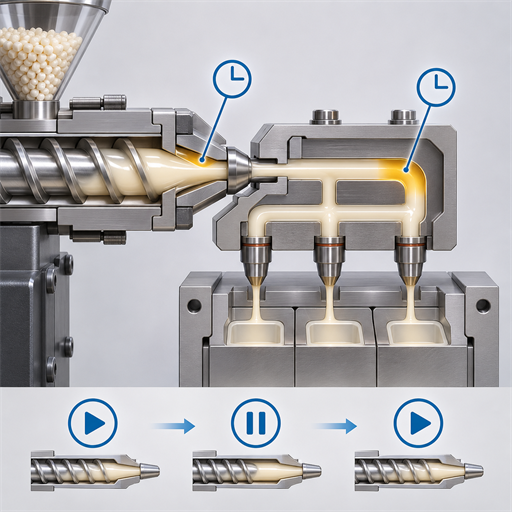
Record time as well as temperature
Two runs can share the same setpoints while exposing material to different histories. Record startup, interruptions, reduced production, restart and shutdown events. Match those times to the part sample IDs. Include the previous resin and the approved changeover sequence, not just the settings loaded for the current job.
The Delrin molding guide discusses thermal stability, handling and processing within its acetal-homopolymer scope. Excessive time and temperature are degradation concerns. Use the exact grade’s current instructions and safety data sheet (SDS) for operating decisions; don’t transfer a family-level limit to an unspecified POM grade.
Keep three fields: setpoints, screen readings and actual measured values. Use approved methods to measure them. Record the instrument or method and the measurement time.
A screenshot of barrel settings cannot establish the temperature everywhere in a nozzle or hot runner. Ask the technician to check the controls and readings where needed.
Illustrative scenario: Dark specks appear in parts collected after a pause. The team keeps restart samples. It logs the pause, restart steps and cavity IDs. That timing makes retained material a question worth checking; it doesn’t prove that the pause degraded the current resin or exclude earlier contamination.
Examine where material can remain
Record shot mass and cycle time. Log screw recovery and how much resin the process uses over time. Give these records to the machine specialist. Is this machine suited to this job?
Keep interruptions visible: a steady-run average can hide a long pause with material still exposed to heat.
To estimate average residence time, divide the mass held in the system by the mass used per unit of time. Both values must cover the same system. Treat it as a screening estimate.
It cannot establish the age of the oldest material in a stagnant region. Does the mass include the nozzle and hot runner? If you don’t know how much resin is held, don’t report an exact time.
The Delrin hot-runner manual addresses hold-up and thermal balance in that material family. It also distinguishes melting in the screw/barrel from transferring melt through the hot runner. Ask the equipment specialist to review possible retained-material paths instead of assuming all zones share one history.
Useful review points include the nozzle path, check-ring area, transitions and manifold branches. These are candidate locations, not instructions to dismantle hot equipment. Only authorized personnel should inspect or collect melt samples under approved plant procedures.
Prepare the full grade code, current processing guide, SDS and event log for the producer or equipment discussion. If abnormal gassing, pressure or suspected incompatible material appears, follow the plant’s emergency procedure. Do not improvise a hotter purge, nozzle-opening method or disassembly sequence from a general troubleshooting article.
Localize the Defect Without Hiding Tooling Problems
Compare cavities and time periods
Ask whether the pattern follows one cavity, all cavities, a transfer event or a restart. Keep samples separate by cavity and collection time. Don’t put them all in one bag. That loses the link to each path.
Use a repeatable inspection method so lighting or magnification doesn’t become an unrecorded variable.
Set up a blank cavity/time table before taking samples. Put cavity IDs across the columns and sample times down the rows. In each cell, enter the sample ID and how many parts were checked. Add the defect type and count, using the agreed definition.
Keep the raw entries even if the later summary combines them.
| Pattern to investigate | Candidate route | Evidence needed next | What it cannot prove alone |
|---|---|---|---|
| Similar marks across cavities | Common feed or upstream melt path | Material-route and event comparison | That the resin supplier caused them |
| Recurrence in one cavity | Local runner, gate, vent or surface condition | Cavity map and specialist inspection | That every upstream influence is absent |
| Appearance after a pause | Retained material or a restart-related condition | Timed samples and measured process history | The chemistry of the particle |
| Recurrence after cleaning | A remaining source or renewed deposition | Defined post-action checks and retained samples | That the cleaning method was necessarily wrong |
Use the patterns to plan checks. They don’t prove a cause. Keep results that challenge your view as well as those that support it: a proposed cavity-only explanation needs review if the same inclusion appears elsewhere.
Separate surface cleaning from melt-path work
The KPAC note discusses deposits on the mold surface and the role of vents and mold temperature. The Delrin hot-runner manual discusses heat and flow-path concerns in its resin family. Use these sources to plan a tool review. Their examples don’t set values or dimensions for every POM mold.
Ask the tool specialist to compare the observed location with vent condition, surface temperatures and flow restrictions. Log what was checked and any approved work. Detailed gate or vent redesign requires the actual tool and grade information, rather than a copied troubleshooting value.
Cleaning the cavity face does not clear resin held inside a melt path. Record each task separately. Identify exactly what was cleaned, who approved the method and when the next samples were taken. “Machine cleaned” is too broad to interpret if only the mold face was treated.
Keep the wider engineering-plastic selection criteria in view if a material change is proposed. A substitute must still meet the part’s requirements. Changing grade to suppress a visible symptom cannot, by itself, validate the new material or explain the old defect.
Verify Recovery and Release a Traceable Record

Define the comparison before the intervention
Agree on the action and its owner first. State what result would support the proposed cause. Where you can, change one planned factor. Keep the rest of the trial basis fixed.
If safe recovery needs several actions at once, record the whole package. Don’t claim to have isolated one cause from that combined intervention.
Use the control plan and customer requirements to set the checks. State how many parts to inspect, where to collect them and what counts as a defect. Set the period for checking whether it returns.
There is no universal number of clean shots that clears every POM process. If restart was the suspected trigger, include it in the plan. Follow approved plant steps for any restart check.
Illustrative scenario: The first parts look clear after approved cleaning. The shift leader keeps the lot on its agreed hold while the scheduled verification samples are assessed. The record asks whether the original pattern returns; it does not convert a clean first sample into a successful long-term outcome.
Check looks, dimensions and function against their own limits. A visually clear part does not establish all required properties. List the tests the part needs. Name who can approve its release.
This is especially relevant if the intervention changed the processing window or material.
Keep a release record another shift can audit
Use the following fields as a worksheet, adapting the sampling details to your plant:
- Observation and samples: Defect description, cavity/time map, photographs and retained sample IDs.
- Baseline: Grade, lot, blend, machine/tool identity, measured conditions and interruption history.
- Action and controls: Approved intervention, owner, timing and factors held constant or changed together.
- Verification: Collection sequence, inspection method, raw results and comparison with acceptance criteria.
- Disposition: Remaining uncertainty, affected product decision, authorizing person and recheck triggers.
Keep two decisions clear: can the process resume, and is the cause known? The quality owner may allow a run with added checks while the source is still unknown. This must follow the approved quality process. Record both decisions explicitly.
If the cause is unknown, say so. The last action taken isn’t proof of cause.
If defects recur, preserve the failed verification samples and compare them with the baseline. Escalate through the agreed quality process with the material, machine and tool records together. More setting changes without records make the results harder to read. Retain the comparison even when it challenges the first hypothesis.
For the next sourcing discussion, browse the Yifuhui pellet catalog and prepare the exact grade, lot, samples and process-history questions. A clear record helps keep a material inquiry focused without promising that a replacement resin will solve an unconfirmed process problem.
POM Mold Deposits and Black Specks: Practical Questions
Use these answers to decide what evidence to collect next. Apply the current grade documents and plant procedures to any operating action; a general answer cannot approve a purge material, setting change or production release.
Can you identify the cause from the color of a speck?
No, color tells you what a speck looks like, not what it is or where it entered. Compare saved feed and parts, cavity patterns and process history. If you need to identify the speck, ask the quality team or producer about a suitable test. Keep the sample ID linked to its source.
Why can black specks return after purging?
Old material may remain, dirty feed may still enter, or a local tool issue may persist. A clear purge sample doesn’t prove every melt path is clear. It can’t approve later parts. Log where and when specks return, then compare the pattern with the cleaning and restart record.
Does drying POM prevent mold deposits?
Follow the exact grade’s drying guidance. Drying doesn’t prove that a colorant is compatible, remove every foreign particle or clear old resin from the machine. Check packaging and moisture as one part of the work. Keep the heat history and the record of where deposits form as separate checks.
Does one affected cavity prove the mold is the source?
No, a repeat in one cavity calls for a closer look at that path, gate, vent and surface. It doesn’t rule out a source upstream. Save parts by cavity and compare the same time periods. Ask the tool specialist to check results that support and challenge the proposed cause.
When is production ready for release after cleaning?
Follow the control plan, customer requirements and quality owner’s decision. Complete the agreed sample checks, look for repeat defects and test the required part properties. Keep the raw results and record any gaps. Finishing the cleaning or finding one clear sample doesn’t, on its own, approve the production lot.
For a reusable record structure, return to the pellet quality-control checklist. Start with the next observation that can distinguish competing explanations, then give that check an owner and an acceptance basis.